Engineered/Solid Hardwood Flooring
Engineered wood floors can be installed successfully on, above, or below grade level and can be installed
directly to concrete or wood subfloor.
Solid wood floors can be installed successfully on or above grade level over wood subfloor. For solid install
over concrete, additional waste should be expected.
Pre-Installation Guidelines
**National Wood Flooring Association (NWFA) Installation Guidelines Technical Publication**
Installation of flooring constitutes acceptance of the material and the site conditions (see moisture testing
below) at the time of installation. (Refer to NWFA, Part II, E. #3). This includes the ambient conditions
relative humidity and temperature, subfloor/substrate, while considering the 5% industry allowance
variance from grading and manufacturing tolerances.
Jobsite Evaluation
1. Enclosure: Ensure the building is enclosed, i.e., all exterior windows/doors are installed and in
weather stripped.
2. HVAC System: Check if the heating or cooling system is operational. Permanent systems should be
operating before, during, and after installation.
3. Temperature and Humidity: Maintain appropriate conditions:
o Engineered: 35%-55% relative humidity
o Solid: 30%-50% relative humidity
o Temperature: 60°F-80°F
o Use a calibrated hygrometer to confirm and document these parameters.
4. In-floor Heating Systems: Solid wood and some wood species in Engineered wood is excluded from
radiant heat install. If applicable, turn on the system prior to installation. Post-installation, gradually
increase the temperature, not exceeding 85°F. Use an in-floor data logger to monitor conditions is
recommended.
Acclimation
1. Acclimation is not based on an amount of time but rather moisture content of the surrounding
environment compared to the wood flooring to be installed.
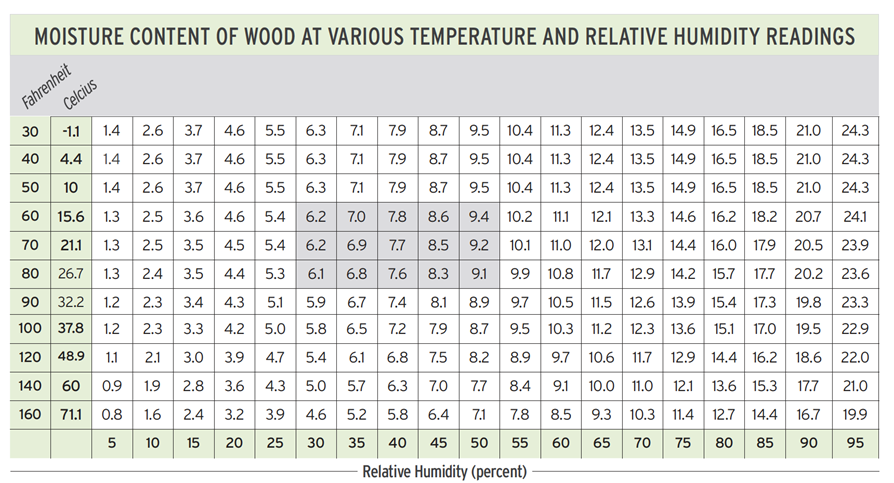
Example: If the relative humidity is within the required amount (i.e., engineered 35%-55% and 60°F-80°F and solid 30%-50% and 60°F-80°F) and temperature the wood flooring can be installed if the
moisture content is compared to the following chart (created by the Forest Product Laboratory). The
graph below depicts the optimal moisture content of the flooring in conjunction with the ambient
environmental conditions.

Moisture Content Check
2. Wood Flooring and Subfloor:
o Solid strip (<3”): ≤4% moisture content difference
o Wider material (≥3”): ≤2% moisture content difference
o Use a species-specific moisture meter and take 20 readings per 1,000 ft² (an additional 4
readings every 100 ft² thereafter) for subfloor and 40 readings for the product (an additional 4
readings every 100 ft² thereafter).
o Subfloors have to be structurally sound. Address any movement, delamination, squeaks/noise,
water damage, physical damage, etc with the homeowner, builder or any responsible party
prior to installation of wood flooring. The installer can address loose fasteners,
squeaks/noises, etc. Some issues are not the responsibility or capability of the installer.
Document any conditions with notes and photographs.
o Subfloors must be flat. Being level is not the same as being flat. We require that the subfloor
needs to be ¼” in 10 feet or 3/16” in 6’. For glue down installation over concrete the
requirement would be 1/8” in 6’ and 3/16” in 10’. Please reference NWFA Installation
guidelines (pg 58-59) to learn how to correct a subfloor that does not meet those guidelines.
o Subfloors must by DRY and CLEAN. If new construction, the Builder is responsible to
control the moisture during the building process. The installer is required to confirm the
moisture contents of the substrate prior to any wood flooring installation. Subfloors need to be
free of drywall compound and consider sanding any seems of the subfloor in order to avoid
problematic peaks in the wood subfloor.
3. Existing Substrates/Flooring
o Existing vinyl, resilient, cork or linoleum floor covering may be installed over if well bonded
to and fasteners must be able to penetrate the wood subfloor by 5/8”.
o Using a glue down method it is imperative to use of an approved adhesive.
o Existing ceramic tile, terrazzo, slate or marble may be glue to if the adhesive manufacturers
guidelines are met.
o Carpet is NEVER acceptable to install our wood flooring over.
4. Concrete Subfloor:
o Slab should be a minimum of 60 days old before testing.
o If the slab is existing, does not mean that it should not be tested for moisture
o Use appropriate devices for moisture testing.
o If excessive moisture is detected, perform further tests (ASTM f-2170 or ASTM 1869).
o If readings exceed 3% calcium chloride or 85% rH, use an adhesive with a moisture
mitigation component.
o A 3,000 psi is the minimum required compressive strength for concrete slabs for direct glue
down wood floor installations. Lightweight concrete less that 3,000 psi is not acceptable for our
flooring to be adhered to using a wood flooring adhesive. Consider applying an approved
cementitious based leveler.
o Subfloor toppings my be used to flatten or smooth the concrete as long as they are approved
by the adhesive manufacturer chosen for the project.
o The slab has to be free of any contaminants the may compromise the adhesives bond, remove
immediately. This includes, but not limited to, curing compounds, waxes, oils, paint, dust,
drywall
o compound, etc. If asbestos is present DO NOT DISTURB. Follow the adhesive requirements
for PH balance and CSP ratings (Concrete Surface Profile)
5. Concrete Surface Preparation:
o Remove non-compatible sealers, waxes, oils, paints, and drywall compounds.
o Apply water drops to test for sealers.
o Screen slick steel trowel slabs with a 30-grit abrasive if necessary.
o Ensure the slab is flat within 1/8” in 6’ and 3/16” in a 10’ radius.
o Grind slab where high or fill where low to maximize flatness
Installation Guidelines
• Before you start your installation you must understand the potential risks to your health by following the
Occupational Safety and Health Administration (O.S.H.A.), check this website for your local area
www.osha.gov.
• Personal protective equipment is highly recommended. This includes, but isn’t limited to, eye protection,
ear protection, respiratory protection (avoid inhaling airborne wood dust) equipment, etc.
• Prior to installing, check all saw safety guards to ensure they are in working condition.
• Wood dust can be an irritant to both skin and lungs.
• Exotic species tend to be more-dense and that density can potentially wear down saw blades prematurely.
Nail Down & Glue Down Installation
1. Choose a Starting Wall: Consider the most aesthetically or architecturally important elements in the
room.
2. Expansion Space: Leave a minimum of 1/2” expansion space around the perimeter.
3. Snap a Working Line: Parallel to the starting wall, accounting for the width of the board, tongue,
and expansion space.
4. Starter Board: Install along the edge of the working line and begin installation.
5. Adhesive Application (Glue Down Only): Follow adhesive manufacturer’s instructions regarding
spread rate, trowel size, working time, and flash time.
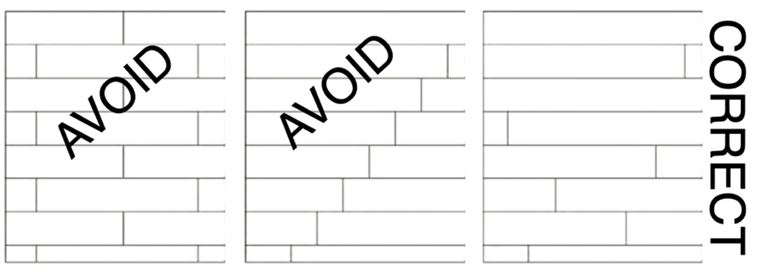
6. Board Distribution: Avoid H patterns and stair stepping.
7. Stagger End Joints:
o Strip flooring (≤2 ¼”): Minimum 6”
o Plank (3”-5”): 8”-10”
o Plank (>5”): 10”

8. Roll the Floor (Glue Down Only): Use a clean roller to ensure proper adhesion.
Floating Installation (Engineered Flooring Only)
1. NOT for Solid Wood: Do not use this method with solid wood floors.
2. Flatness: Ensure flatness (Critical for proper installation):
o 1/8” in 6’ and 3/16” in 10’
3. Direction: The floating installation allows the floor to run in any direction and over a flat, smooth
existing floor covering.
4. Transition Moldings: Required for installations exceeding 20’ in width and 40’ in length.
5. Heavy Objects: Avoid placing heavy objects on floating floors. This would include a kitchen island,
kitchen cabinets or heavy China cabinet.
6. Movement: Inform the end user about potential floor movement. If movement is not acceptable to
the end user, consider another installation method.
Important Notes
• Acceptance: INSTALLATION CONSTITUTES ACCEPTANCE of the Elegance Plyquet Wood
Flooring as delivered, including site conditions. If problems are discovered, immediately stop
installation and contact your supplier for a resolution.
• Documentation: Record all moisture readings and environmental (rH% and temp), consider writing
the results on the subfloor and take a picture in case it is needed for a possible future claim.
